
DIY Advent Calendar
I realize that not everyone celebrates Christmas, so if you don’t, you might not find this post interesting. Please feel free to skip over it. 🙂
For me, Christmas is my very favorite time of the year. It’s only 39 days away! That means you still have time to put together an advent calendar. For me, an advent calendar is a way to prepare for Christmas. We had an advent calendar only once when I was growing up, the paper kind with the little perforated windows you tore open to reveal something. In a family of 8, there’s only so many little windows to be opened by each kid, and my mom got tired of our fighting over who got the honor. But I love the idea of an Advent Calendar. I saw that some tea companies put out tea advent calendars. I love that idea!! Too bad the prices are so high. But I’m creative, right? I decided I can make my own, so I did. So can you. I’ll show you how.
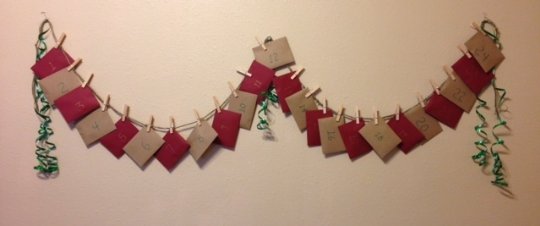
You should think ahead about what theme or look you want. Rustic, like the one I made? Something cute for kids? At this time of the year all kinds of Christmas decorations are on sale at craft stores.
You will need:
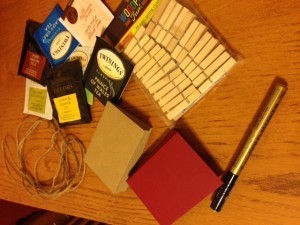
- 24 small goodies/gifts. I’m a tea lover, so I used individual tea bags. You could use small chocolates, or a mix of small gifts like earrings, lip balms, candy, mini ornaments, gift cards, etc. If you’d like to make this a religious themed advent calendar, you could write or print out Bible verses to include with each gift. Cost could be anywhere from $10.00 for a couple of variety packs of tea to whatever you choose to spend on gifts. Diamond earrings, for instance, might run a bit more.
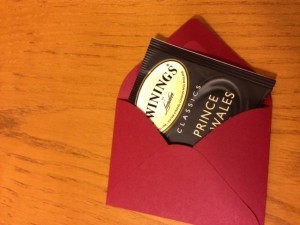
- 24 small containers. I used envelopes like gift cards come in that I ordered online. Maybe they are available locally in craft stores or stationary stores? You could use mini gift bags, or opaque candy bags or even wrap each little gift individually. My cost for 100 envelopes was $14.00 including shipping and handling.
- 24 (approx. 2″ long) mini clothes pins. Bought in a package of 24 from Hobby Lobby for $3.49
- 3-5 feet of some kind of string to hang the gifts on. I used jute for my rustic theme. You could use holiday ribbon, or even that fake evergreen garland. No cost as I already had a spool of jute.
- A pen to write numbers on your containers. No cost as I already had pens.
- A few decorations to add to your string, like Christmas bows, Christmas picks, small ornaments, etc. No cost, as I used leftovers from last year.
Directions:
 1. Write a number on each container, 1 through 24.
2. Fill each container with a gift. I licked all 24 of my envelopes closed at one time. Yuck. I suggest using a damp wash cloth. I swear, I can still taste that glue in my mouth.
3. Tack the string to the wall in the formation you want. You could also string this on the Christmas tree like garland. I never put my tree up so early, but I know a lot of people do.
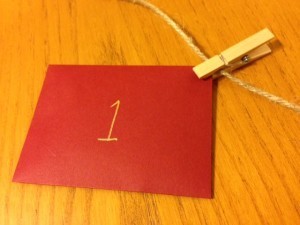 4. Take each individual container and use the clothespins to clip them to your string in numerical order, #1 first and #24 last.
5. Add some ribbon or bows or whatever decorations you like to the ends.
Then wait until December 1 to open the first gift. Open one gift a day until Christmas Eve. Wasn’t that easy? The great thing is you can use this idea again next year, and change up the colors and decorations for a whole new look. I almost can’t wait for the after Christmas sales on decorations at Joann’s and Michael’s so I can do another Advent Calendar next year. Maybe I should get one of those inexpensive bare wreathes to clip the envelopes on?
If you decide to try to make one of these, please tell me about it. I hope you have fun getting ready for Christmas!!
Leave a Reply

4 Responses to DIY Advent Calendar